Postgres’s pg_upgrade on Windows: the documentation misses a lot

Postgres is the gift of timesuck. It’s a great database, especially for spatial data. However, without insider knowledge, simple tasks eat time.

Latest example: pg_upgrade. It shrinks upgrade complexity–if it works! For Windows users, the documentation has useless and incomplete steps.

Here’s a better procedure. I used it for upgrades on Windows. It assumes you only have the old version installed and you’re using the default x64 install location of C:\Program Files\PostgreSQL. The steps:

  1. Install the newer Postgres with the Windows installer. Don’t let it use TCP port 5432 yet; that’s used by your current Postgres instance. The installer should see this and recommended 5433. Add needed extensions with the Application Stack Builder. If you use PostGIS, don’t install the sample database. Do nothing else with the new instance.
  2. With the Services control panel, shut down both the old and new databases.
  3. Create a new account on your PC named postgres. This is a Windows user, not a user inside the Postgres database. This account does not need to have the same password as the Postgres account in your databases. Add it to your PC’s Administrators group. (I didn’t have this account. I don’t know why Postgres or pg_upgrade need it. A better design would permit me to specify database accounts for each install with pg_upgrade command line switches. The --username switch didn’t appear to do that, plus it would use the same username across both databases, which may not always be proper.)
  4. With Windows Explorer, give the Windows postgres account Full Control permission on both 1. C:\Program Files\PostgreSQL\ and 2. both instances’ data directories, which are at C:\Program Files\PostgreSQL\version\data. Yes, you must give this permission to both data directories. For some reason, the data directories do not inherit permissions. (Make sure the permissions are standard, in the sense that they are inherited by children. This should happen if you use the simple permissions dialog.)
  5. (This change puts your database in an insecure state. I strongly recommend you revert these changes before you do anything that causes the database services to turn on.) Create new pg_hba.conf files for both instances. These files are in C:\Program Files\PostgreSQL\version\data. It takes two steps:
    1. Back up the current files by renaming them to pg_hba.conf.bak. You’ll revert them when done.
    2. Create new pg_hba.conf files in each instance’s data directory. The new files only have these two lines:
      host all all 127.0.0.1/32 trust
      host all all ::1/128 trust
  6. Open a command prompt window in administrator mode, then:
    1. RUNAS /USER:postgres "CMD.EXE"
    2. Change to the bin directory of the newer install of Postgres. It will be C:\Program Files\PostgreSQL\version\bin.
    3. Run this: pg_upgrade.exe --old-datadir "C:/Program Files/PostgreSQL/oldVersion/data" --new-datadir "C:/Program Files/PostgreSQL/newVersion/data" --old-bindir "C:/Program Files/PostgreSQL/oldVersion/bin" --new-bindir "C:/Program Files/PostgreSQL/newVersion/bin" (change oldVersion and newVersion to reflect your actual directories for the old and new versions of Postgres.) This will take a while to run if you have a lot of data. Wait until this is done before continuing.
  7. In the postgresql.conf file for the new Postgres instance, change the listening port to 5432 (from 5433).
  8. Revert the security-reducing changes to the pg_hba.conf files for both servers:
    1. Delete the current pg_hba.conf files.
    2. Rename the pg_hba.conf.bak files back to pg_hba.conf.
  9. Through the Services control panel:
    1. Start your new Postgres instance.
    2. Reconfigure both Postgres services as needed. It is possible that the service for your old Postgres instance has Startup type set to Automatic. It probably should be set to Manual or Disabled. This makes it harder for both the old and new instances to run at the same time.
  10. Vacuum and reanalyze all databases.
  11. If you created a postgres Windows account, remove it.

The new Postgres instance’s postgres database account (database account, not the Windows account you already deleted) will have the same password as the old Postgres instance.

Once you’ve verified that everything works properly, you might consider uninstalling the old Postgres copy.

QUESTION: Does pg_upgrade.exe cause the stopped Postgres instances to start? If not, then some of the above steps may be unnecessary. In short, the old instance would be shut down as step 1, the new instance is installed also using port 5432, and the edits to pg_hba.conf are unnecessary. Let me know if you want to try this!

Do projects matter for IT?

(Originally posted on Eric Brown’s Technology, Strategy, People & Projects blog on June 7, 2011, with some edits. Still highly relevant at the end of 2014!)

Short answer: not as much as many believe.

Information technology (IT) focus is shifting from classical projects to agile services. Here’s why.

Reason 1: Much of IT defies project definition

A classical project has a predetermined start, end, work breakdown, and result. When done, the result goes into “maintenance mode”, and you jump to the next project.

But what if something never has a “maintenance mode”? What if a work breakdown is impossible to know?

For example, the web is never done. A university’s web site must be exciting and work quite well; the key audiences are technologically progressive prospective and current students. What university wants technophobic students? Relevant university sites must keep up with rapidly evolving consumer technologies.

A university’s web site is a good example of an agile service: an adaptive mix of agile applications and expertise. These are where a lot of IT’s attention is going.

Agile services don’t end. They are not classical projects.

Reason 2: Small projects don’t matter much

Isn’t a service just a lot of mini-projects? And isn’t the latest trend to make projects smaller?

Neither matters much. Small projects are really large tasks or iterations in an agile service.

By themselves, small projects don’t tell the value of IT. Agile services do.

Reason 3: Virtualization and clouding

The largest classical IT projects are implementations. Virtualization and especially clouding make it easier to create new things, sometimes minimizing implementation projects into simple tasks.

Without huge implementations, the focus shifts to maximizing value of existing investments. Again, emphasizing agile services at the cost of classical projects.

Reason 4: Agile is where it’s at

Classical projects use waterfall, a prescriptive method from the manufacturing and construction industries. It’s from a time when the pace was steady, change was resisted, and top down was how it happened.

Relevant IT is the opposite: fast-paced, adaptive, and responsive. That’s why agile management is natural for IT: it encourages adaption, continual reassessment, early problem discovery, and faster completion.

I’m not the only one seeing this. Look at Google search trends for agile project (blue) versus waterfall project (red):

agile vs waterfall

But this isn’t just about improving how projects are done. Agile does something that waterfall can’t: manage services.

Paraphrasing Men In Black II, “Waterfall projects: old and busted. Agile services: new hotness.”

Do classical projects belong in IT?

Classical projects still have a place in relevant IT. We will still have cookie cutter projects with well-understood paths and vanilla outcomes.

However, “well-understood” and “vanilla” and are being outsourced, such as email, web systems, ERP systems, and more. If not outsourced, they may be “keep the lights on” , undifferentiated from plant operations. Or their business value is not intrinsic; the value is in what others—users, innovators, developers—can wring from them.

Agile services are the future of IT. It’s how relevant IT works, it’s how relevant IT provides business value, and it’s how relevant IT communicates what it does.

Heartbleed = overcomplexity + input validation failure

The Heartbleed vulnerability is because the OpenSSL code didn’t validate an input. It’s also because OpenSSL had unnecessary complexity.

OpenSSL has a heartbeat feature that allows clients to send up to 64 kilobytes of arbitrary data along with a field telling the server how much data was sent. The server then sends that same data back to confirm that the TLS/SSL connection is still alive. (Creating a new TLS/SSL connection can take significant effort.)

The problem is if the client specifies that it sent more data than it actually did, the server would send back the original data and some of its RAM. For example, suppose the client sent a 1K message but said it’s 64KB. In response, the server would send a 64KB message back, which was the original 1K message plus 63K of data from the server’s RAM, which could include sensitive, unencrypted data from other programs.

How this could have been prevented:

  1. Avoid pointless complexity: don’t require the client to also send the length of the arbitrary text. The server should have been able to detect the length of the text.
  2. Validate all input. The server failed to ensure that the client’s description of the text length matched its actual length. (The fact that the server could detect the message’s actual length further validates my view on #1.)

Keep it simple! In addition to driving up creation and maintenance costs, needless complexity is more opportunities for things to break.

Google is not linking to HTTPS versions of everyone’s sites

In the University Web Developer’s (UWEBD) listserv today, a conversation took off about how Google was linking to the HTTPS version of Florida Gulf Coast University’s web site. It was a problem because of FGCU’s broken HTTPS channel.

I was surprised at the misconceptions that came over a technically astute email group. Here’s my statement:

Two inaccurate things have been said about Google.

Inaccurate statement 1: Google is securing others’ sites. Dangerous misconception! Google cannot “secure” your site. If Google’s link to you uses HTTPS, that does not “secure” your site. It just means Google is linking to your site’s secure channel. “Securing” a site includes transport security (HTTPS channel) among many other things. Most importantly, YOU, the site owner, do the “securing”, not Google.

Inaccurate statement 2: Google is en masse sending users to HTTPS channels on web sites. Nope. For example, Southern Methodist University has had both HTTP and HTTPS channels for www.smu.edu for over a decade. Google links to the HTTP version.

Starting late last year, Google encrypts traffic between the user and its search site. If you visit http://google.com, Google redirects you to https://google.com. That has no bearing on whether Google’s search results link to HTTPS or HTTP channels. However, it may limit site owners’ view of search keywords (reference); that isn’t related to the inaccurate statement.

You can still get unsecured Google search using http://www.google.com/webhp?nord=1 (note the highlight), but only if you’re not signed in. A search on Florida Gulf Coast University on the unsecured version still links to the HTTPS channel.

There’s are many reasons why Google is linking to FGCU’s secure channel, but it’s almost certainly not because of Google’s own change.

Getting high quality graphics out of Quantum GIS

It’s hard to get print-quality graphics out of Quantum GIS (QGIS). There’s a kludgy command line method, but it doesn’t always work right (see that page’s comments). It’s stupid that you have to take a GUI-based program to the command line to get good graphics!

I asked for something straightforward 2 years ago (link), but it hasn’t gotten much traction. In the meantime, you can use the Print Composer as a workaround. Here’s how:

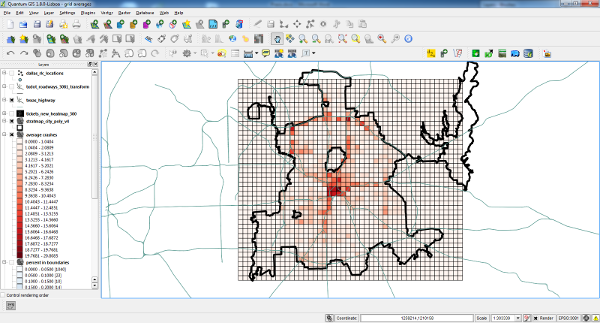
  1. Orient your QGIS viewport to fully include the part you want to export. It’s OK if it shows a little more than what you want to export. For example, I’m only wanting the gridded part of this view:
    qgis broad view
  2. File > New Print Composer.
  3. In the button bar, click Add new map (Add new map button).
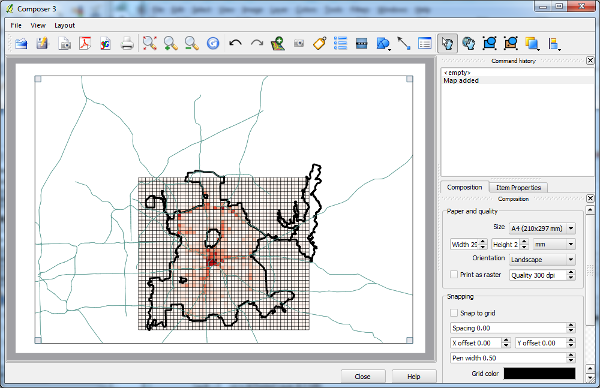
  4. With the mouse pointer, draw a large rectangle on the canvas. It’ll show the view you you established in step 1 and more:
    Print composer - initial view
  5. Notice how the image is offset from center. Center this graphic in its box:
    1. Click the Move item content button (Move item content button).
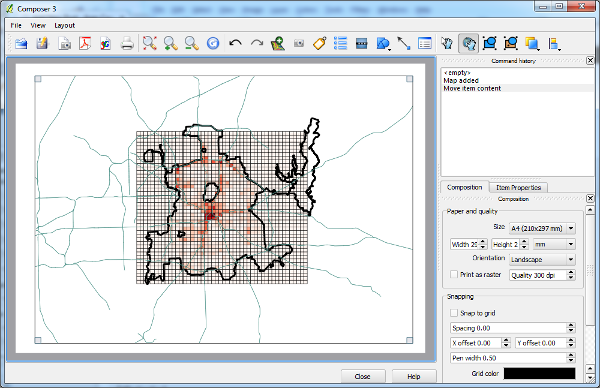
    2. Figure out what you want to be in the center of the exported image. With your mouse inside the rectangle you drew, drag the image until the part you want to export is centered in the rectangle. In my case, I just moved it up a bit:
      Centered viewport
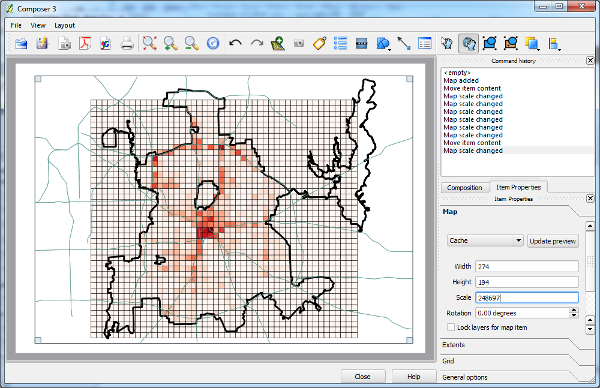
  6. Since I am really only shooting for the grid in my final output, I need to zoom in. On the bottom right side, click on the Item Properties tab. You should see a field named Scale. Gradually reduce the value in Scale, starting with about 10% at a time, until what you want almost fills the frame. Press enter after you change that number to see the effect of that change. After adjusting the scale down by about 1/3 (a smaller number in Scale zooms in the view), I finally have it looking as I want:
    Centered and zoomed in
    (I’ve filed issues to add a tool to zoom in and out of items and to better explain the scale field.)
  7. Click the Export as Image button (Export as Image button) and save the PNG using the dialog.

Voila, you have a high quality image! You may still need to crop it to get it just right.

If you need a higher resolution, then click on the Composition tab and change the DPI value to the right of Print as raster. (Print as raster is probably not related to the DPI; this has been filed as a bug (http://hub.qgis.org/issues/7973).) Export again.